Glass door construction process I believe we are not very understanding, in fact, the installation of glass partitions, the top of the door limit slot width should be greater than the glass thickness of 2 ~ 4mm, groove depth between 20 ~ 30mm, in order to glue injection. The installation method can lead out two metal decorative plate edges from the centerline of the bullet, and then install the limit slot at the top of the door frame according to the edge line. The wood plate in the slot is adjusted to the depth of the slot. Adjust by increasing or decreasing the pad. The following small series introduces the glass door construction technology for the interior decoration construction process.
Interior decoration construction process specification, fixed glass installation
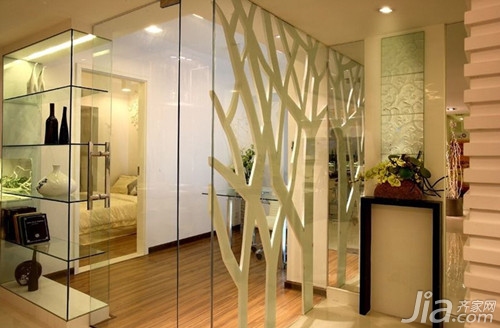
1. The installation of fixed partitions shall be carried out after the construction of other processes in the room is basically completed. The fixed glass partition and the movable glass door leaf must be uniformly placed on the line. According to the requirements of the design drawing, the partition line and the position line of the glass door should be released to determine the position of the door frame and accurately measure the elevation of the ground and the height of the door frame.
2. The width of the installation glass partition wall and the limit slot at the top of the door should be greater than the glass thickness of 2 to 4 mm, and the depth of the groove is between 20 to 30 mm for the purpose of glue injection. The installation method can lead out two metal decorative plate edges from the centerline of the bullet, and then install the limit slot at the top of the door frame according to the edge line. The wood plate in the slot is adjusted to the depth of the slot. Adjust by increasing or decreasing the pad.
3, the installation of metal veneer wooden tray. The installation method may be to pry square wood on the original embedded wooden bricks, or to fix the square wood by means of expansion bolts, and fix the square wood on the ground, and then use a multi-purpose adhesive to attach the metal decorative panel to the wooden side. The square tube of aluminum alloy can be fixed on the frame column with aluminum angle, or be fixed on the wooden brick buried in the ground with wooden screws.
4. Install the door frame. Press the centerline of the bullet to erect the door frame and then use the plywood to determine the frame size and position of the door frame (note that the size of the decorative surface should be reduced). Finally, the outer surface of the metal decorative surface is covered, and the front surface seams of the trim are to be placed in the middle position of both sides of the mounted glass. The seam location must be accurate and vertical.
5, glass installation. Use a glass sucker (or glass sucker) to suck and hold the thick glass, and then hold the suction cup to lift the thick glass plate by 2-3 persons and stand upright to move to the installation site to be in place. Positioning method: insert the upper part of the glass into the limiting groove at the top of the door frame, then place the lower part of the glass on the centerline of the bottom support, and install the position of the two door frames so that the sides of the thick glass are just right. The metal fittings that seal the door frame face the seam, and it is required that both the inside and the outside cannot see the veneer seam.
6, fixed glass. In the bottom of the wood on the inside and outside the nail two flat square bar sandwiched between the thick glass, but leave a gap of about 4mm from the thick glass plate, and then in the flat square bar coated with all-purpose adhesive to decorate the metal plate Stick in the square wood and the two flat square sticks.
7, injection glass seal. Glass glue is injected into the gaps on both sides of the top groove and on both sides of the bottom glass notch, and between the thick glass and the door frame column. The injection sequence should start from the end of one gap to the end and must not stop in the middle. The operation essentials are as follows: the force of the caulking gun pressing handle should be uniform, and the speed of moving along the gap should also be uniform. That is, with the extrusion of the glass glue, the rubber injection opening is moved at a uniform speed, so that the glass adhesive forms a uniform gap at the gap. The straight line. Finally scrape off excess glass glue with a plastic sheet and wipe off the glue with a clean cloth.
8, docking between the glass. Fixed part of the thick glass plate, due to the size of the width is too large, must be assembled with two or more pieces, two pieces of joint alignment will inevitably form a joint, butt joints should be left 2 ~ 3mm distance (butt joints Glass cuts must be poured.) After the glass is fixed, it is necessary to use glass glue to enter the gap. After filling, the plastic sheet is also used to scrape the glue so that the gap forms a clean uniform straight line. Clean the glue trace on the glass surface with a clean cloth.
Interior Decoration Construction Process II.
1. Put the thick glass that has been cut and chamfered, and install the upper and lower crosspieces up and down, and set the height of the door (the height includes the upper and lower sides). If the height of the door is not enough, you can use the glass edge at the upper and lower rails. Fill the veneer to adjust the thickness. If the height of the door leaf exceeds the installation size, professional glass workers are required to cut off the excess part of the thick glass door leaf. Therefore, the glass height of the door leaf should be rather short and not too high.
2. Immediately after the height is determined, the glass should be fixed with the upper and lower crosspieces. The method is to insert a small wooden bar at the same time in the gap between the thick glass and the upper and lower metal rails, and gently tap into it, then inject glass adhesive between the small wooden bar, the thick glass and the metal gap, and finally the glass The gaps with the metal rails are sealed with glass adhesive.
3. Positioning and installation of glass door leaf: First, position the pin on the cross beam of the door frame with its own adjusting screw and call it out from the plane of the beam 1~2mm. Then, the glass door leaf is erected and the hole position of the rotating pin connector in the horizontal block under the door leaf is set. Align the pivot pin of the spring and turn the door leaf to fit the hole into the pin. Then rotate the door leaf 90 with the pin axis. (Note that the door must be upright when rotating) so that the door leaf is at right angles to the crossbeam of the door leaf. At this time, align the hole on the cross member of the door frame with the hole in the rotating connector in the crosspiece of the door leaf, and then move the positioning pin out and insert it into the hole on the horizontal fan rotating pin connector of the door leaf about 15mm. Can be opened and closed.

Interior decoration construction process 3, install the glass door handle
When cutting the glass door leaf and chamfering the edges, the hole for installing the door handle should be made at the same time. The connecting part of the mounting handle must not be tight when it is inserted into the glass door handle hole and should be slightly loosened. If it is too loose, put a soft tape on the insertion site. Before installation, apply a little glass glue to the glass part of the handle. When the handle is assembled, the roots of the handle are tightly attached to the glass and then the screws are tightened to ensure that the handle does not loosen.
Editor's summary: The glass door construction process of the interior decoration construction process is introduced here. For more information, you can follow this site information.
Decoration construction knowledge
Roller Shutter Lock Set, Solid brass cylinder with full brass teeth key or computer key.
- 1 right side + 1 left side = 1 pair , 1 pair = KEY ALIKE ,Supply 3 keys for 1 pair
- Single turn, 3 pins Cylinder Lock
- Interchangeable: With most common roller shutter locks available on the market. The reinforced bolt makes the roller shutter more resistant to attack.
- Available for motorized roller shutter
- Reinforced steel bolt: 2mm steel plated folded back on itself to reach overall 6.5mm thickness
- Straight, shifted, Lengthened bolt available with 6mm hole
- Rustproof zinc plated box and components


Roller Shutter Lock Set,Roller Shutter Lock,Slide Bolt Lock Set,Lock Set For Roller Shutter
Rayma(SJZ) International Trading Co., Ltd. , https://www.raymalock.com