1. Knife point
The tool position is a reference point on the tool. The path of the relative movement of the tool point is the machining route, also called the programming track.
2. Tool setting and tool setting point
The tool setting means that the operator overlaps the tool point and the tool point by a certain measuring method before starting the NC program. The tool can be used with the tool setting tool, the operation is relatively simple, and the measurement data is relatively accurate. You can also use the gauge block, feeler gauge, dial gauge, etc. to position the tool on the CNC machine tool after positioning the fixture and installing the parts on the CNC machine. For the operator, it is very important to determine the tool point, which will directly affect the machining accuracy of the part and the accuracy of the program control. In the batch production process, it is necessary to take into account the repeatability of the tool point. It is necessary for the operator to deepen the understanding of the numerical control equipment and master more tool setting techniques.
(1) Principle of selection of the knife point
It is easy to find on the machine tool, easy to check during processing, easy to calculate during programming, and the tooling error is small.
For the tool point, you can select a point on the part (such as the center of the positioning hole of the part), or you can select a point outside the part (such as a fixture or a point on the machine), but it must have a certain coordinate with the positioning reference of the part. relationship.
Improve the accuracy and precision of the tool. Even if the accuracy of the parts is not high or the program requirements are not strict, the machining accuracy of the selected tool part should be higher than the machining accuracy of other positions.
Select the part with large contact surface, easy to monitor, and stable processing as the tool point.
The tool point should be unified with the design reference or process reference as much as possible to avoid the reduction of the tool accuracy or even the machining accuracy due to the size conversion, and increase the difficulty of NC machining or CNC machining of the parts.
In order to improve the machining accuracy of the parts, the tool points should be selected as much as possible on the design basis or process reference of the parts. For example, a part positioned with a hole is preferably a center of the hole as a tool setting point.
The accuracy of the tool point depends not only on the accuracy of the numerical control equipment, but also on the requirements of the part processing. The accuracy of the tool setting is manually checked to improve the quality of the part NC machining. Especially in the batch production, the repeatability of the tool point should be taken into account, and the accuracy can be checked by the coordinate value of the tool point relative to the machine origin.
(2) How to select the knife point
For numerical control equipment such as CNC lathe or turning and milling machining center, since the center position (X0, Y0, A0) has been determined by the numerical control equipment, the axial position can be determined to determine the entire machining coordinate system. Therefore, it is only necessary to determine an end face of the axial direction (Z0 or relative position) as the tool point.
For a three-axis CNC milling machine or a three-axis machining center, it is much more complicated than a CNC lathe or a milling center. According to the requirements of the NC program, it is necessary to determine not only the origin position of the coordinate system (X0, Y0, Z0), but also the machining coordinate system. The determination of G54, G55, G56, G57, etc., sometimes depends on the operator's habits. The tool point can be set on the workpiece or on the fixture, but it must have a certain coordinate relationship with the positioning reference of the part. The Z direction can be determined simply by determining an easily detectable plane, and the X and Y directions. Determine the planes and circles that need to be related to the positioning datum based on the specific part selection.
For the four-axis or five-axis numerical control equipment, the fourth and fifth rotating axes are added, and the same three-axis numerical control equipment selects the matching point. Because the equipment is more complicated and the numerical control system is intelligent, more cutting methods are provided. It needs to be determined according to the specific numerical control equipment and specific processing parts.
The coordinate relationship between the tool point and the machine coordinate system can be simply set to be related to each other. For example, the coordinates of the tool point are (X0, Y0, Z0), and the relationship with the machining coordinate system can be defined as (X0+Xr, Y0+). Yr, Z0+Zr), machining coordinate system G54, G55, G56, G57, etc., can be input through the control panel or other means. This method is very flexible and highly technical, which brings great convenience for subsequent CNC machining.
3. Zero drift
The zero drift phenomenon is caused by the environmental influence factors of the numerical control equipment. Under the same cutting conditions, the same equipment, the same fixture, the numerical control program, the tool, and the same parts are used for the same equipment. Or the phenomenon of reduced accuracy.
The phenomenon of zero drift is mainly manifested in a phenomenon of precision reduction in the numerical control machining process or can be understood as the inconsistency of precision in numerical control machining. The phenomenon of zero drift is inevitable in the process of numerical control machining. It is ubiquitous for numerical control equipment, and is generally affected by the environmental factors surrounding the numerical control equipment. In severe cases, it will affect the normal operation of numerical control equipment. There are many reasons for the zero drift, mainly temperature, coolant, tool wear, spindle speed and feed rate change.
4. Tool compensation
After a certain period of NC machining, the wear of the tool is unavoidable, which is mainly reflected in the change of the tool length and the tool radius. Therefore, the tool wear compensation mainly refers to the tool length compensation and the tool radius compensation.
5. Tool radius compensation
In the contour machining of the part, since the tool always has a certain radius such as the radius of the milling cutter, the movement path of the tool center is not equal to the actual trajectory of the required machining part, but it is necessary to offset a tool radius value. Become tool radius compensation. Therefore, the radius value of the tool must be taken into account when performing part contour NC machining. It should be pointed out that the UG/CAM NC program is programmed with the ideal machining state and accurate tool radius. The tool movement trajectory is the trajectory of the tool core. The state of the numerical control device and the wear degree of the tool are not considered. influences. Therefore, whether for contour programming or tool core programming, the implementation of the UG/CAM NC program must take into account the effects of tool radius wear and reasonable use of tool radius compensation.
6. Tool length compensation
In CNC milling and boring machines, when the tool is worn or replaced, when the tool nose position is not at the programmed position of the original machining, the change of the size must be compensated by extending or shortening the offset value of the tool length direction. Ensure that the machining depth or the position of the machined surface still meets the original design requirements.
7. Machine coordinate system
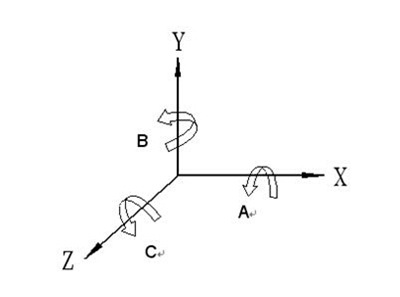
The coordinate axis naming of CNC machine tools is defined as the Cartesian coordinate system for the linear motion of the machine tool. The coordinates are named X, Y, Z, which are called the basic coordinate system. The movements centered on the X, Y, Z coordinate axes or the coordinate axes parallel to the X, Y, and Z coordinate axes are called the A axis, the B axis, and the C axis, respectively, and the positive directions of A, B, and C are right-handed. The law of the spiral is determined.
Z-axis: The spindle that transmits the cutting force is usually specified as the Z-axis. For machine tools where the tool rotates, such as a boring machine, milling machine, drilling machine, etc., the axis of the tool rotation is called the Z axis.
X-axis: The X-axis is usually parallel to the workpiece clamping surface and perpendicular to the Z-axis. For machine tools with tool rotation, such as horizontal milling machines and horizontal boring machines, the right-hand direction is the positive direction of the X-axis when viewed from the main axial direction of the tool. When the Z-axis is vertical, for a single-column machine such as a vertical milling machine, Seen in the direction of the main axis of the tool, the right hand direction is the positive direction of the X axis.
Y-axis: The Y-axis is perpendicular to the X-axis and the Z-axis, and its direction can be determined according to the determined X-axis and Z-axis, according to the right-handed Cartesian coordinate system.
The definition of the rotary axis is also in accordance with the right-hand rule, rotating around the X axis to the A axis, around the Y axis to the B axis, and around the Z axis to the C axis.
The axis of the CNC machine is shown below.

CNC machine tool axis
The machine origin is the coordinate origin of the machine coordinate system. There are some fixed reference lines on the machine, such as the spindle center line; there are also some fixed reference planes, such as the work surface, the spindle end surface, and the side of the work table. After the axes of the machine tool are manually returned to their respective origins, the position of the machine origin can be determined by the distance between the reference line and the reference plane on each axis component. This point is described in the instruction manual of the CNC machine.
8. Part machining coordinate system and coordinate origin
The workpiece coordinate system, also known as the programmed coordinate system, is a coordinate system established by the programmer when the part machining program is programmed with a fixed point on the workpiece as the origin. The origin of the part coordinate system is called the part zero (part origin or program zero), and the tool path coordinates during programming are determined by the coordinates of the part's outline in the part coordinate system.
The origin of the machining coordinate system is called the adjustment point in the machine coordinate system. During machining, the part is mounted on the machine with the fixture, and the clamping position of the part is fixed relative to the machine tool, so the position of the part coordinate system in the machine coordinate system is also determined. The distance between the measured part origin and the machine origin is called the part zero offset, which needs to be pre-stored in the CNC.
During machining, the part origin offset can be automatically added to the part coordinate system, so that the CNC system can determine the absolute coordinate value of the machining according to the machine coordinate system. Therefore, the programmer can ignore the actual installation position and installation accuracy of the part on the machine tool, and use the offset function of the numerical control system to compensate the position error of the part on the machine tool through the offset value of the part origin. This feature is very convenient to use. The position of the part coordinate system is referenced to the machine coordinate system. On a CNC machine, multiple part coordinate systems can be set and stored in G54/G59, etc. The part zero is generally set at the design basis and process reference of the part. For easy calculation of dimensions.
Generally, the numerical control equipment can preset a plurality of working coordinate systems (G54 to G59). These coordinate systems are stored in the machine memory. The working coordinate system is based on the machine origin as the reference point, and each is represented by the offset from the machine origin. It is necessary to input the machine numerical control system in advance, or the coordinate system set before processing.
The machining coordinate system (MCS) is the positioning reference for all tool path output points for part machining. The machining coordinate system is represented by OM-XM-YM-ZM. With the machining coordinate system, it is not necessary to consider the mounting position of the workpiece on the machine during programming, as long as it is programmed according to the characteristics and size of the workpiece.
The origin of the machining coordinate system is the workpiece machining zero. The position of the workpiece machining zero is arbitrary and is selected by the programmer according to the characteristics of the part when programming the CNC machining program. The workpiece zero can be set on the workpiece or on the fixture or on the machine. In order to improve the machining accuracy of the parts, the workpiece zero point should be selected on the machining surface with higher precision. For the convenience of data processing and simplified programming, the workpiece zero point should be set on the design basis or process reference of the part. For symmetrical parts, it is best. The workpiece zero point is set on the center of symmetry, which is easy to find and easy to check.
9. Clamping origin
The clamping origin is common in CNC machine tools and machining centers with rotary (or oscillating) worktables, such as the rotary center. The offset from the machine reference point can be stored in the origin offset register of the CNC system for the CNC system. The origin offset is used for calculation.
CPVC can be used in the process of extrusion and injection according to different specifications. It can be used for producing hot water pipe, chlorine pipe, sulphuric acid pipe, high-pressure electric cable sheath, fitting, and valve, etc. Also, depending on the degree of chlorination ,CPVC can be changed to manufacturing composite materials, In addition, CPVC is also used as a modifier for plastics with a blend of a thermoplastic or thermosetting plastic blend alloying,Improve the performance of the material, making it superior engineering.

Chlorinated Polyvinyl Chloride
Chlorinated Polyvinyl Chloride Resin, CPVC Resin, CPVC Compound, Chlorinated Polyvinyl Chloride
Shandong Novista Chemicals Co.,Ltd (Novista Group) , https://www.novistachem.com

