The installation of bathroom cabinets is more professional. Generally, it is provided by the merchants in the store. If it is purchased from the Internet, or is not installed after purchase, the following points must be taken care of to avoid causing relatively large losses.
Dengle bathroom cabinet
First, confirm the installation position of the bathroom cabinet: In the paving tiles and wall tiles, we must confirm the installation position of the bathroom cabinet, because the installation of the bathroom cabinet is to be perforated in the wall, but also need to enter the water hole and the drainage hole Once installed, it is generally not possible to move the position, so confirming the installation position of the bathroom cabinet is a prerequisite before installation.
Second, the purchase of bathroom cabinets should confirm the shape and size of the bathroom cabinet according to the installation position: After the position of the bathroom cabinet is determined, the shape and size of the bathroom cabinet can only be determined according to the installation position.
Third, look for the pipeline diagram of the water pipe and the wiring diagram of the wire: During the installation, punch the hole with the air drill on the wall. Therefore, it is very important to confirm the pipeline diagram and the wiring diagram before installation. If you break the water pipe or wiring diagram, you must Open part of the wall tiles, causing unnecessary losses.
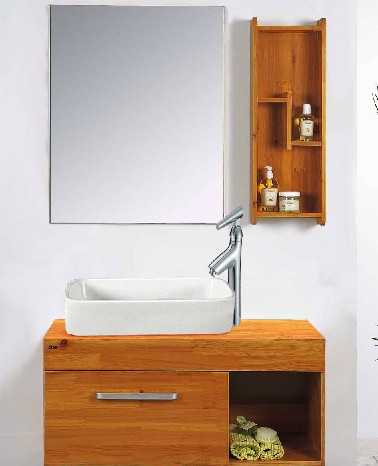
Fourth, confirm the installation height of the bathroom cabinet: The standard installation height of the general bathroom cabinet is 80~85cm, which is calculated from the floor tile to the upper part of the wash basin. The specific installation height is also determined according to the family members' height and usage habits. , but it is most suitable within the standard height range.
5. The fittings and installation of each bathroom cabinet are not the same, that is, the same model of punching size (opening to the wall hole size) is not the same, but the installation process is basically the same.
First, the bathroom cabinet installation process
1, before installation, check whether the spare parts are complete.
2. Install the delta valve to ensure that the hot and cold inlet pipes remain flush.
3, measuring distance, install the water pipe. Apply glue evenly to ensure tight tube-to-tube connections.
4. Install cabinet corners to see if all corners are at the same level. After installation, make appropriate adjustments.
5. Put the bathroom cabinet against the wall. Look at the location of the outlet pipe. If it is not appropriate, make some changes.
6, install the basin faucet. It is advisable that the faucet be purchased with the bathroom cabinet so that the outlet angle is suitable.
7. Fix the basin faucet with a nut. One hand should hold the faucet when fixing, so as to avoid position deviation after being installed.
8. Place the washbasin with the faucet on the bathroom cabinet and adjust the position to the best.
9. Connect the water inlet and outlet pipes of the basin and the water. The length is appropriate and the position is reasonable.
10. Install the handle of the cabinet and make appropriate adjustments.
11. The method of connecting the basin and the ceramic tile is fixed with silica gel so as to achieve the purpose of the cabinet body being firm and preventing leakage.
12. Turn on the tap to test the water discharge to see whether the leading angle is appropriate and whether the water flow is smooth or not.
13. Clean the cabinet after testing.
Second, the main cabinet installation method
A. Wall-mounted bathroom main cabinet installation method: first check whether the wall is solid (or use floor-standing), press the hole of the selected hole, punch the hole on the wall with the impact drill, and install the plug in the wall-mounting accessories. Insert the hole, and then use the self-tapping screws to lock the cabinet with the wall, you can also use the expansion screw to install, after the cabinet is installed, then the counter basin with the wooden cabinet of the cabinet, adjust the flat.
B. Floor-mounted bathroom cabinet installation method: Place the cabinet horizontally and screw the cabinet leg assembly onto the fixing piece through the double-headed screw, then place the cabinet in a proper position, and try to push the cabinet leg to the outside to force the cabinet body. balanced. And adjust to horizontal through the anchor bolts. When placing, see if the four feet are stable. If it is not on the same level, the cabinet is not evenly stressed and the lines are twisted, which not only affects the appearance but also affects the service life.
Third, the installation method of side cabinets and racks is the same as the installation method of wall-mounted bathroom cabinets.
Fourth, bath mirror installation method
A. Measure the size of the mirror with a tape measure, insert the wall plug into the wall hole according to the installation specification according to the installation specification, and then screw the screw into the wall plug to a suitable depth.
B. According to the two holes on the back of the mirror, insert the self-tapping screws into the wall. Lens wipes are ideal for newspapers.
V. Precautions and maintenance
A. Keep the air circulation in the bathroom and the cabinet is dry and prolong the service life. Avoid watering. If there is any water droplets, wipe it dry with a cloth.
B. When assembling, please do not touch the mirror of the cabinet and the ground. It should be covered with soft materials to avoid bumps.
C. During assembly, take care to prevent metal objects such as screwdrivers from scratching the surface of the board.
D. When cleaning the cabinet, the cleaner of the cabinet is best to use neutral reagents, such as: use toothpaste to wipe dirt, soft cloth to wipe, is also a simple maintenance method, can also spray on the cabinet
E. Some liquid waxes for furniture are available for easy wiping. Use a soft cloth when cleaning. Do not scrub with metal wires, scouring pads, or strong chemicals.
F. When storing cleaning products in the cabinet, it is better to put a layer of plastic pad or square towel that can be cleaned conveniently below it.
G. Keep the wet and dry separation of space as much as possible to prevent water from being left on the cabinet for a long time
H. The pipes should be connected and checked for leaks.
Tile Tiles Bathroom Space Furniture Cabinet Tiles Tile Specifications
Side Glow Fiber is different from solid core side glow fiber. It is a new and green lighting product, of which the diameter ranges from 0.75mm to 3.0mm.
Used with various light sources such as LED light source, Metal Halide light source, Halogen light source etc., fiber optic lighting has following advantages:
1. Color changing, which is virtually unbreakable and energy efficient;
2. Suitable for interior and exterior applications. It is UV protected, which has an algaecide and fungicide treated exterior jacket for maximum durability against the elements.
3. Side Glow fiber optic cable is strong enough for amusement park rides, extreme cold weather as well as underwater applications. With no heat or electricity in the cable, it is safer compared with typical lighting design restrictions.
DSPO manufacture a range of fibre optic side glow, which are used widely on all sorts of decoration engineering , such as building , nightclub , disco , hotel , market , plaza and museum , and honored as an honored as an ideal material to replaced current means of decorative illumination.
We make customized different size of side glow fibre optic , you are welcome to let us know your requirements and application .
Fibre Optic Side Glow,Side Glow Fibre Optic,Side Glow Optical Fiber,Side Emitting Fibre Optic
Jiangxi Daishing POF Co.,Ltd , https://www.opticfibrelight.com